

This Tutorial was inspired by the lovely new tube from Arthur Crowe!This Tut was created by me Dani and any similarties are purely coincidental!
Supplies Needed
FTU Scrap by Kittz Kreations called BadassChick
FTU Template 225 from Missy over at Divine Intentionz
I chose IloveMetal by ArthurCrowe she is PTU so you must have a license
You will also need filter Radiance from the XERO pack
and the word art from me BadGirls Rock
Start out by resizing the Template to 500/357 make sure that you color thin rect 1 black and thin rect 2 redish pink.
Next go to the FTU SCRAP and open papers b-p1(drag layer infront of the large circle and create a clipping mask by going to Layer and choosing clipping mask or ctrl-G), gb-p002(drag layer infront of the smaller circle using the same ctrl-g create a clipping mask), and gb-p0038(drag layer infront of the small squares and ctrl-g or layer/clippingmask over squares).

Next we will add the elements you will need gb-mendedheart(place on the left corner of the white frame and resize to fit on frame), gb-bear(place infront of right side of the white frame but make sure it will be behind the BadgirlsRock wordart), gb-string(first duplicate this layer make sure the first layer is behind the mended heart and the bear but on top of the white frame. Then take duplicate layer and drag behind the white frame. Take your erase tool and on the top layer of the string erase some so it looks strung through the frame), and gb-n( resize to fit in lower right corner of the tag infront of the bear but going to be behind wordart.) Then add the word art in front of the bear and the music notes.
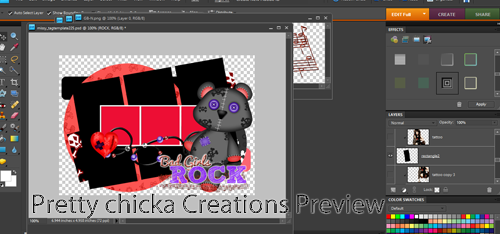
Now open your tube. First add the tube and resize the face to fit in the center of the front frame (should be resized a little smaller then the left and right copies) , then add the tube again and duplicate this time one showing on the left side of the frame and one of the right make sure two different parts are showing and then choose from the dropdown on layers and make the original and duplicate on the right and left luminous. Then add radiance filter to the center tube. also make sure to clipping mask ctrl-g or layers/clippingmask the tube to the framebackground. Next we will drag a new layer of the tube on for the 3 black rectangles all in different poses of your choice and make luminous again and add radiance filter to all three layers and clipping mask to each rectangle ctrl-g or layers/clippingmask.
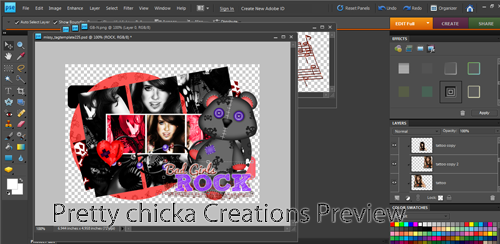
Now add your main Tube layer usually full version of the tube to the Right side of tag and resize to fight to your liking. right click on tube choose edit layer style check mark glow, choose outer glow and change color to purple of your choice and press ok. then Add Credits and Name and you are finished.
Made my finishing Tag for Kittz cause of her awesome kit :)

Hope you enjoyed this Tut and good luck and happy photoshopping or PSPING :)

No comments:
Post a Comment